A one page website displays all your essential information, features, services, contacts on a single page. It makes it easier for the visitors to get a fast and comprehensive view about the content you offer. Single page websites became very trendy recently, because this type of web design is perfect for portfolios, apps or product sites, basically anything that is not content heavy. Single page web design can be an excellent technique for tackling smaller websites.
Displaying all the content of a website in a one page is a great way to save time for your visitors as they won’t need to jump around from one page to another and the site only needs to load once, making the user experience more fluid and continuous.
So, taking all the above one page benefits into account, I decided to develop, and share with you, my own responsive theme for one page Kentico 10/11 website or sub-site. The theme is based on the latest Bootstrap 4 framework and contains four custom widgets to make it easy for your editors to update the content.
To get us started with the installation of the free Belona Kentico theme download the above package and uncompress the zip file.
There are three files in the package:
- Belona-Master.txt
- Belona.css
- Belona.js
Create a New Master Template
For the purpose of this tutorial, I will call all the files Belona, but you’re free to call your files whatever you like.
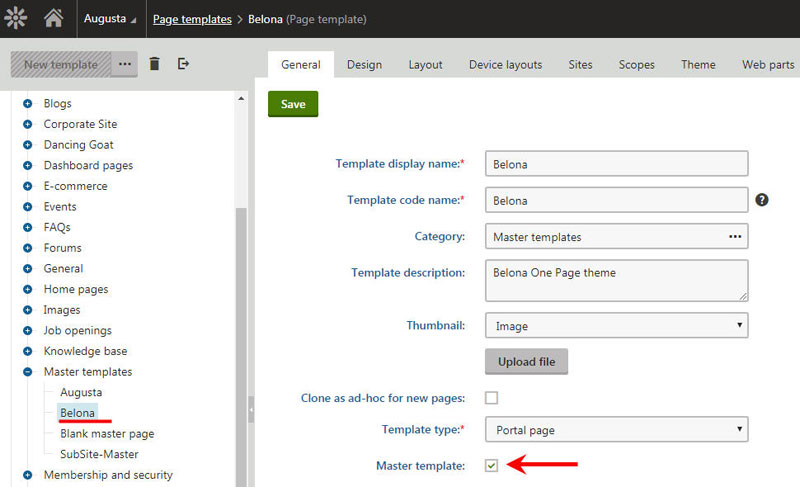
In your administration console, go to Page Templates and click on Master Templates. Create a new template and call it Belona.
On the newly created master template, at the top of the page, click on the Layout Tab and Copy+Paste the code provided in the Belona-Master.txt and hit Save.
Create a New CSS File
Next, go back to the dashboard and click the CSS stylesheets icon (or search for it) and create a New CSS Stylesheet, call it Belona and upload Belona.css file provided in the package and hit Save.
Create a New Javascript File
Next, go back to the dashboard and click the Javascript files icon (or search for it) and create a New Javascript file, call it Belona and upload Belona.js file provided in the package and hit Save.
Once all the necessary files are in place let’s create the one page website or sub-site.
Master Page Template
For the purpose of this tutorial, I will create a sub-site under my Augusta site, but you’re free to create the site wherever you like.
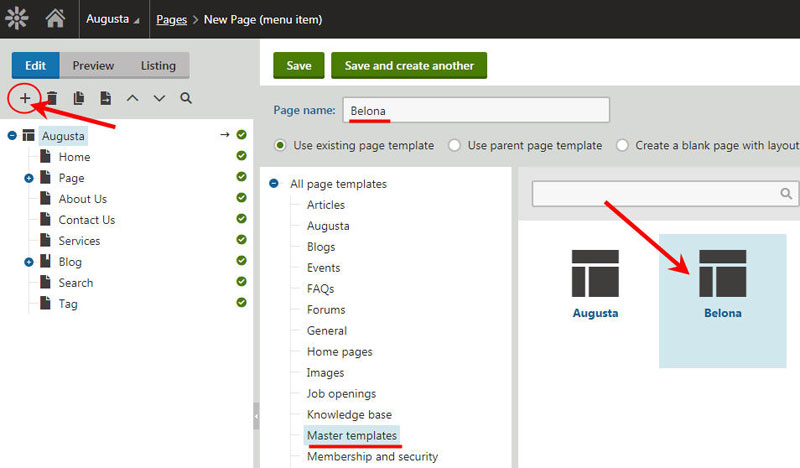
So, under the main site, click the + sign to create a new page, give it a name (I call it Belona), navigate to the Master templates and select Belona template and hit Save.
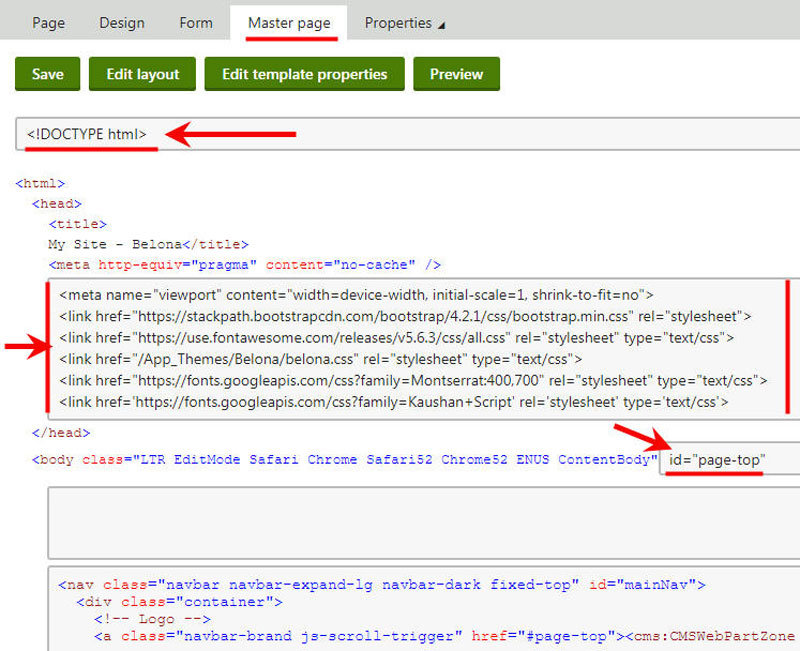
Now, click the Master page tab and insert the <!DOCTYPE html> at the top.
Also, add the following viewport and style metas and the navigation reference in the Body textbox: id=”page-top” and hit Save:
<meta name="viewport" content="width=device-width, initial-scale=1, shrink-to-fit=no">
<link href="https://stackpath.bootstrapcdn.com/bootstrap/4.2.1/css/bootstrap.min.css" rel="stylesheet">
<link href="https://use.fontawesome.com/releases/v5.6.3/css/all.css" rel="stylesheet" type="text/css">
<link href="/App_Themes/Belona/belona.css" rel="stylesheet" type="text/css">
<link href="https://fonts.googleapis.com/css?family=Montserrat:400,700" rel="stylesheet" type="text/css">
<link href='https://fonts.googleapis.com/css?family=Kaushan+Script' rel='stylesheet' type='text/css'>
Your master page should look now like this:
Go back to the Page Templates select the Master templates and click on your Belona master page.
On the master page click the Design tab at the top of the page, and let’s start customizing the page zones.
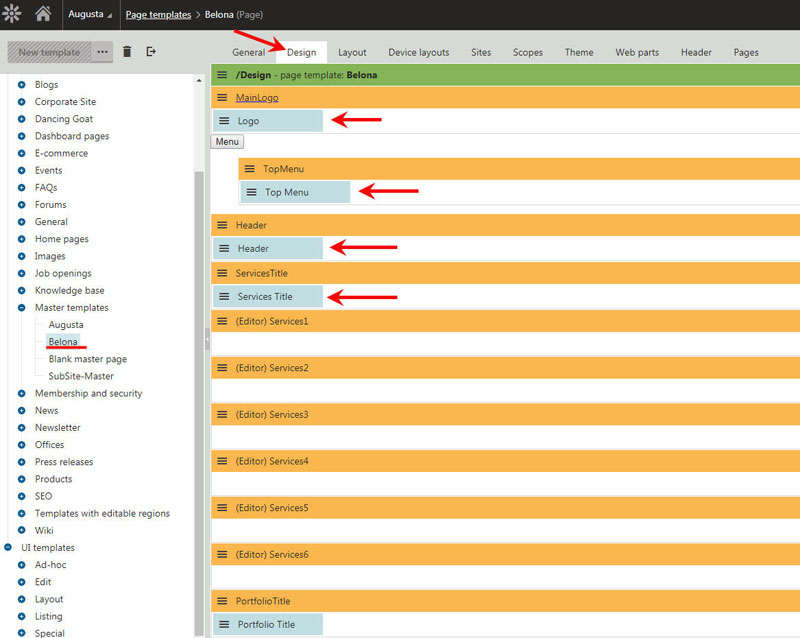
For the MainLogo web part zone add a Static text web part so you can enter the logo.

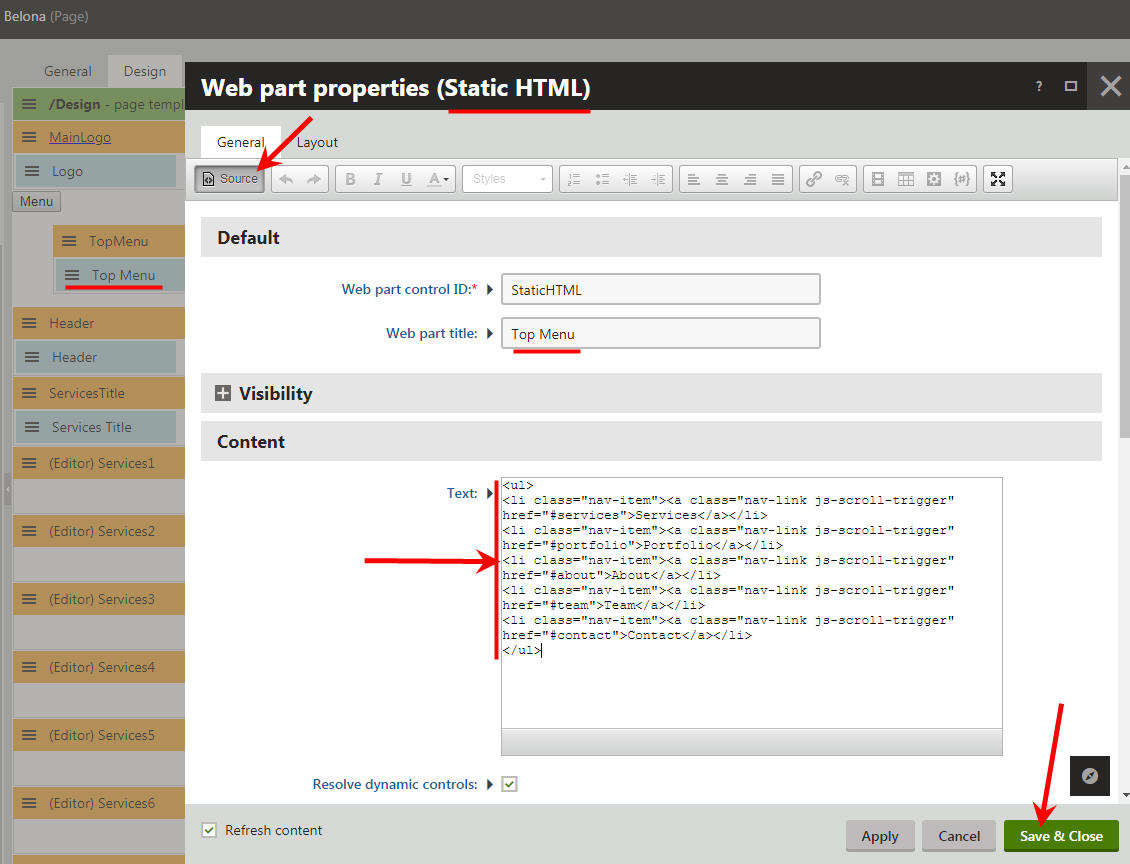
For the TopMenu web part zone add a Static HTML web part, click the Source button to enter the following HTML code needed for the top menu and hit Save:
<ul>
<li class="nav-item"><a class="nav-link js-scroll-trigger" href="#services">Services</a></li>
<li class="nav-item"><a class="nav-link js-scroll-trigger" href="#portfolio">Portfolio</a></li>
<li class="nav-item"><a class="nav-link js-scroll-trigger" href="#about">About</a></li>
<li class="nav-item"><a class="nav-link js-scroll-trigger" href="#team">Team</a></li>
<li class="nav-item"><a class="nav-link js-scroll-trigger" href="#contact">Contact</a></li>
</ul>
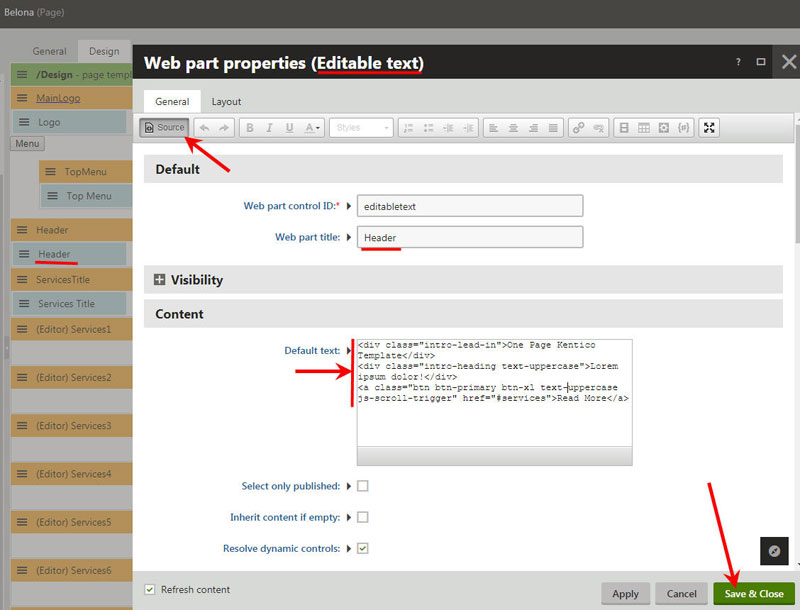
For the Header web part zone add a Editable text web part, click the Source button to enter the following HTML code needed as default text for the Header and hit Save:
<div class="intro-lead-in">One Page Kentico Template</div>
<div class="intro-heading text-uppercase">Lorem ipsum dolor!</div>
<a class="btn btn-primary btn-xl text-uppercase js-scroll-trigger" href="#services">Read More</a>
For the ServiceTitle, PortfolioTitle, AboutTitle, TeamTitle, TeamInfo, ContactTitle, ContactMain, Footer1, Footer2, Footer3 and FooterBottom web part zones add a Editable text web part so your editors can add content.
For the rest of the each web part zones you need to change the Widget Zone Type to Customization by page editor so the editors will be allowed to add their own widgets.
So, click the web part zone menu and then Configure.
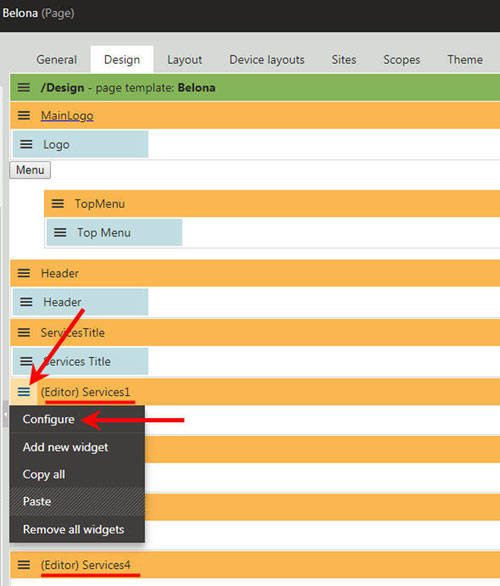
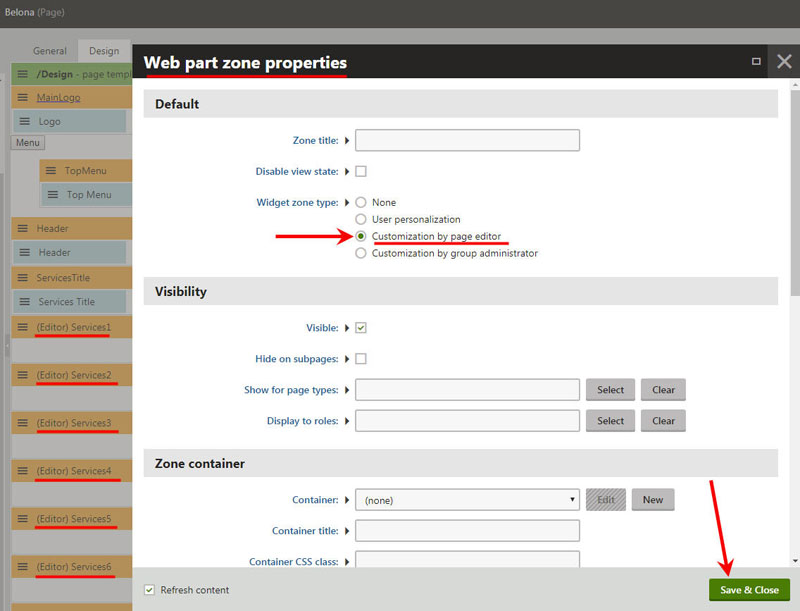
Make sure you change the Widget Zone Type for Services, Portfolio, Timeline and TeamMember web part zones.
Header Section
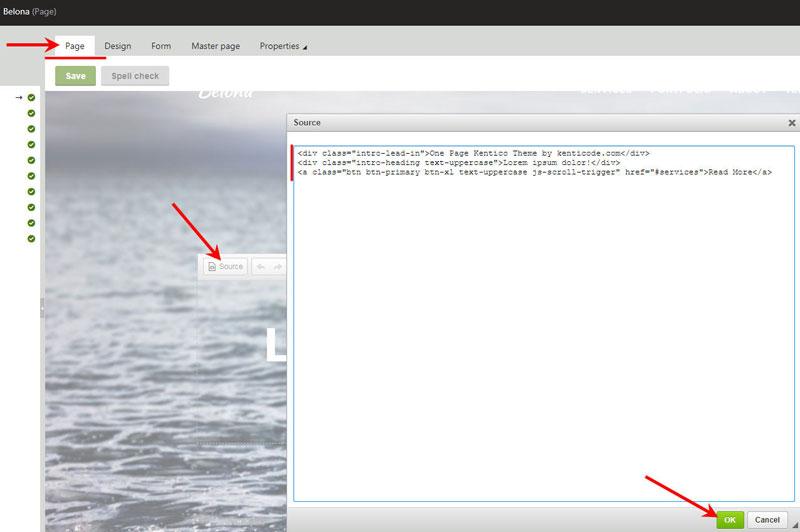
Now, to add some content for the available content zones, make sure you’re on the Page tab and click the Header content area so the Text Editor web part shows and enter some text or click the Source button and to Copy&Paste the HTML code I used in the demo:
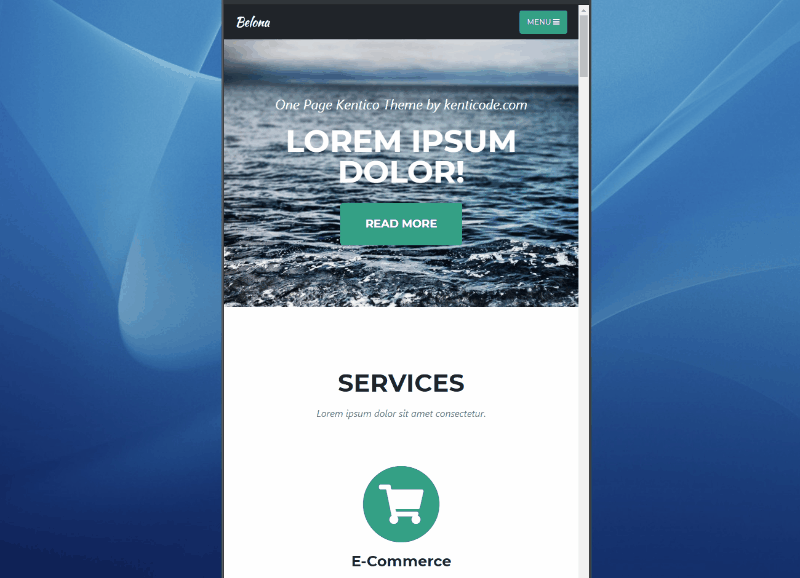
<div class="intro-lead-in">One Page Kentico Theme by kenticode.com</div>
<div class="intro-heading text-uppercase">Lorem ipsum dolor!</div>
<a class="btn btn-primary btn-xl text-uppercase js-scroll-trigger" href="#services">Read More</a>
Services Section
Still on the Page tab, move down the page to Services section and click the Services content area so the Text Editor web part shows up and enter some text or click the Source button and to Copy&Paste the HTML code I used in the demo:
<h2 class="section-heading text-uppercase">Services</h2>
<h3 class="section-subheading text-muted">Lorem ipsum dolor sit amet consectetur.</h3>
Portfolio Section
Move down the page to Portfolio section and click the Portfolio content area so the Text Editor web part shows up and enter some text or click the Source button and to Copy&Paste the HTML code I used in the demo:
<h2 class="section-heading text-uppercase">Portfolio</h2>
<h3 class="section-subheading text-muted">Lorem ipsum dolor sit amet consectetur.</h3>
About Section
Move down the page to About section and click the About content area so the Text Editor web part shows up and enter some text or click the Source button and to Copy&Paste the HTML code I used in the demo:
<h2 class="section-heading text-uppercase">About</h2>
<h3 class="section-subheading text-muted">Lorem ipsum dolor sit amet consectetur.</h3>
Team Section
Move down the page to Team section and click the Team content area so the Text Editor web part shows up and enter some text or click the Source button and to Copy&Paste the HTML code I used in the demo:
<h2 class="section-heading text-uppercase">Our Amazing Team</h2>
<h3 class="section-subheading text-muted">Lorem ipsum dolor sit amet consectetur.</h3>
Contact Us Section
Move down the page to Contact Us section and click the Contact Us content area so the Text Editor web part shows up and enter some text or click the Source button and to Copy&Paste the HTML code I used in the demo:
<h2 class="section-heading text-uppercase">Contact Us</h2>
<h3 class="section-subheading text-muted">Lorem ipsum dolor sit amet consectetur.</h3>
Footer Section
And finally the Footer. There are four content areas in the footer. Click each of Footer content areas so the Text Editor web part shows up and enter your content.
OK, done with the basic setup. On the next article we will create the necessary web parts and widgets for Services, Portfolio, About and Team sections.